December 21, 2022

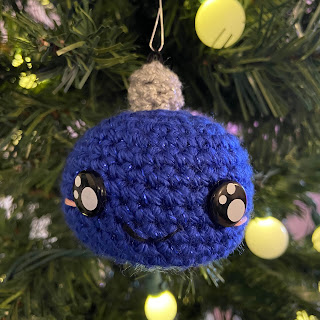
Christmas Tooshie - The Booty Crew

Christmas Tooshie
Free Crochet Pattern


Materials:
Worsted weight/ Size 4 yarn
Christmas Tooshie Color- Caron Simply Soft: Party ~ Royal Sparkle
Ornament Cap Color - Big Twist: Twinkle - Gray
4.00 mm Crochet Hook
15mm Safety eyes
Poly-fil stuffing
Yarn Needle
Embroidery Floss - Black and Pink
Stitch Markers

Terms:
mr - magic ring
slp - slip stitch
ch - chain
st - stitch
rnd - round
row - row
sc - single crochet
blo - back loop only
inc - increase (2sc in the same stitch)
invdec - invisible decrease

Notes:
Invisible decrease - put hook through the front loop of two single crochet stitches, yarn over and pull up loop (two loops on hook) yarn over and pull through two loops.

*This pattern is worked from the top down in a continuous round.
*Use a stitch marker to mark the beginning of the rounds.
*The Booty Crew can be made in any size yarn. So have fun playing with different yarn and hook sizes.
**You may make and sell finished products from this pattern. Don’t forget to credit Crochet by Sarah Louise as the pattern designer. Please don’t copy or post this pattern or photos as your own.**


Body for Christmas Tooshie:
Body color ~ Royal Sparkle
Rnd1: 6 sc in mr (6)
Rnd2: (inc), repeat 6 times. (12)
Rnd3: (inc, 1 sc) repeat 6 times. (18)
Rnd4: (inc, 2 sc) repeat 6 times. (24)
Rnd5: (inc, 3 sc) repeat 6 times. (30)
Rnd6 - 12: 1 sc in every st around. (30)
Rnd13: (invdec, 3 sc) repeat 6 times. (24)
Place eyes between rounds 8 and 9, 5-6 st apart.
Rnd14: invdec, repeat 12 times (12)
Begin stuffing
Rnd15: invdec, repeat 6 times (6)
Fasten off. Leave a long tail for closing hole and shaping booty. Close hole by sewing into front loops only with tail. Pull tight.

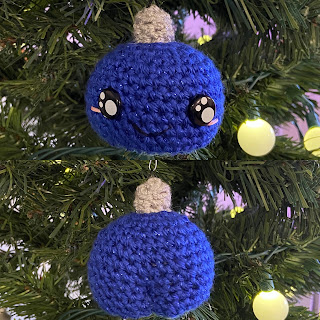
Making the booty: Using the same tail. Insert needle through center hole at Rnd15 and bring out center back at Rnd9. Make line with the yarn insert needle back in center hole at Rnd15. Bring needle through Rnd9 pull yarn tail tightly. Repeat for more definition. Knot and fasten off. Weave tail in.

Ornament Cap:
Cap Color ~ Gray
Rnd1: 3 sc in mr (6)
Rnd2: (inc), repeat 3 times. (6)
Rnd3: blo 1 sc in every st around. (6)
Rnd4: 1 sc in every st around. (6)
Fasten off and leave tail for sewing. With back embroidery floss make a loop on top of the cap. Make sure embroidery floss is secured to the top of the ornament cap. Stuff cap lightly and sew to top of Christmas Tooshie.


Final Touches for Christmas Tooshie:
Use black embroidery floss to a mouth to the front of Christmas Tooshie’s face. Use pink embroidery thread to add cheeks next to the eyes.


Add an ornament hook to the loop of the ornament cap to hang on your Christmas tree.


**Don’t forget to credit 
Crochet by Sarah Louise as the pattern designer. Please don’t copy or post this pattern or photos as your own. I would love to see your beautiful work. Please share a photo! Don't forget to tag @crochetbysarahlouise and use hashtags (#crochetbysarahlouise, #cbslpatterns, #crochetwithsarah)

December 20, 2022

Sandy Claws - The Booty Crew

Sandy Claws
Free Crochet Pattern


Materials:
Worsted weight/ Size 4 yarn
Sandy Claws Body Color- Loops & Threads: Impeccable ~ White
Sandy Claws Hat Colors - Loops & Threads: Impeccable ~ Hot Red. Bernat Baby: Velvet ~ Snowy White
4.00 mm Crochet Hook
Poly-fil stuffing
Yarn Needle
Felt - Black
Embroidery Floss - Black
Sewing thread - Black
Stitch Markers

Terms:
mr - magic ring
slp - slip stitch
ch - chain
st - stitch
rnd - round
row - row
sc - single crochet
inc - increase (2sc in the same stitch)
invdec - invisible decrease

Notes:
Invisible decrease - put hook through the front loop of two single crochet stitches, yarn over and pull up loop (two loops on hook) yarn over and pull through two loops.
Bobble Stitch - yarn over, insert hook into stitch, yarn over, draw loop back through stitch, yarn over pull through 2 loops. Repeat until you have 6 loops your hook. Yarn over and draw through all 6 loops.

*This pattern is worked from the top down in a continuous round.
*Use a stitch marker to mark the beginning of the rounds.
*The Booty Crew can be made in any size yarn. So have fun playing with different yarn and hook sizes. **You may make and sell finished products from this pattern. Don’t forget to credit Crochet by Sarah Louise as the pattern designer. Please don’t copy or post this pattern or photos as your own.**


Body for Sandy Claws:
Body color - White
Rnd1: 6 sc in MR (6)
Rnd2: (inc), repeat 6 times. (12)
Rnd3: (inc, 1 sc) repeat 6 times. (18)
Rnd4: (inc, 2 sc) repeat 6 times. (24)
Rnd5: (inc, 3 sc) repeat 6 times. (30)
Rnd6 - 12: 1 sc in every st around. (30)
Rnd13: (invdec, 3 sc) repeat 6 times. (24)
Rnd14: invdec, repeat 12 times (12)
Begin stuffing
Rnd15: invdec, repeat 6 times (6)
Fasten off. Leave a long tail for closing hole and shaping booty. Close hole by sewing into front loops only with tail. Pull tight.

Making the booty: Using the same tail. Insert needle through center hole at Rnd15 and bring out center back at Rnd9. Make line with the yarn insert needle back in center hole at Rnd15. Bring needle through Rnd9 pull yarn tail tightly. Repeat for more definition. Knot and fasten off. Weave tail in.


Sandy Claws Hat:
Hat color ~ Hot Red
Rnd1: 6 sc in mr. (6)
Rnd2-10: 1 sc in every st around. (6)
Rnd11: (inc, 1 sc) repeat 3 times. (9)
Rnd12-16: 1 sc in every st around. (9)
Rnd17: (inc, 2 sc) repeat 2 times. (12)
Rnd18-22: 1 sc in every st around. (12)
Rnd23: (inc, 3 sc) repeat 3 times. (15)
Rnd24: (inc, 4 sc) repeat 3 times. (18)
Rnd25: (inc, 5 sc) repeat 3 times. (21)
Rnd26: (inc, 6 sc) repeat 3 times. (24)
Rnd27: (inc, 7 sc) repeat 3 times. (27)
Rnd28: (inc, 8 sc) repeat 3 times. (30) Fasten off Red
Rnd29-31: Attach White. 1 sc in every st around. (30)
Fasten off and leave tail for sewing.
Pom-Pom Ball
White
ch 2, in second ch from hook make a bobble stitch then ch 1.
Fasten off and leave tail for sewing. Sew to the top of the hat.
Don’t stuff hat. Sew hat to the top of Sandy Claws’s head after you add the eye, mouth and nose.


Final Touches for Sandy Claws:
Cut black felt in 2 oval shapes. Sew eyes to front the face with thread. Making sure the eyes are evenly aligned so the booty is in the center back. Use black embroidery floss to add a nose and a cross-stitch mouth to the front of Sandy Claws’s face. Sew hat to the top of Sandy Claws’s head at about Rnd 6. If you would like the hat to stay folded over, use some scrap red yarn and stitch folds in place. 


Add an ornament hook to the top of Sandy Claws to hang on your Christmas tree.


**Don’t forget to credit Crochet by Sarah Louise as the pattern designer. Please don’t copy or post this pattern or photos as your own. I would love to see your beautiful work. Please share a photo! Don't forget to tag @crochetbysarahlouise and use hashtags (#crochetbysarahlouise, #cbslpatterns, #crochetwithsarah)

December 14, 2022

Santa Kitty - The Booty Crew

Santa Kitty
Free Crochet Pattern


Materials:
Worsted weight/ Size 4 yarn
Santa Kitty Body Color- Loops & Threads: Impeccable ~ White
Santa Kitty Bow Color- Loops & Threads: Impeccable ~Kelly Green
Santa Hat Colors- Loops & Threads: Impeccable ~ Hot Red and White
4.00 mm Crochet Hook
15mm Black Safety Eyes
14mm Oval Yellow Safety Nose
Poly-fil stuffing
Embroidery Floss - Black
Yarn Needle
Stitch Markers

Terms:
mr - magic ring
slp - slip stitch
ch - chain
st - stitch
rnd - round
sc - single crochet
inc - increase (2sc in the same stitch)
invdec - invisible decrease


Notes:
Invisible decrease - put hook through the front loop of two single crochet stitches, yarn over and pull up loop (two loops on hook) yarn over and pull through two loops.
Bobble Stitch - yarn over, insert hook into stitch, yarn over, draw loop back through stitch, yarn over pull through 2 loops. Repeat until you have 6 loops your hook. Yarn over and draw through all 6 loops.


*This pattern is worked from the top down in a continuous round.
*Use a stitch marker to mark the beginning of the rounds.
*The Booty Crew can be made in any size yarn. So have fun playing with different yarn and hook sizes. **You may make and sell finished products from this pattern. Don’t forget to credit Crochet by Sarah Louise as the pattern designer. Please don’t copy or post this pattern or photos as your own.**


Body for Santa Kitty:
Body color ~ White
Rnd1: 6 sc in mr. (6)
Rnd2: (inc), repeat 6 times. (12)
Rnd3: (inc, 1 sc) repeat 6 times. (18)
Rnd4: (inc, 2 sc) repeat 6 times. (24)
Rnd5: (inc, 3 sc) repeat 6 times. (30)
Rnd6 - 12: 1 sc in every st around. (30)
Rnd13: (invdec, 3 sc) repeat 6 times. (24)
Place eyes between rounds 8 and 9, 5-6 st apart. Place nose between rounds 9 and 10 evenly between eyes.
Rnd14: invdec, repeat 12 times (12)
Begin stuffing
Rnd15: invdec, repeat 6 times (6)
Fasten off. Leave a long tail for closing hole and shaping booty. Close hole by sewing into front loops only with tail. Pull tight.


Making the booty: Using the same tail. Insert needle through center hole at Rnd15 and bring out center back at Rnd9. Make line with the yarn insert needle back in center hole at Rnd15. Bring needle through Rnd9 pull yarn tail tightly. Repeat for more definition. Knot and fasten off. Weave tail in.


Santa Kitty Ear
: (make 1)
Body color ~ White
Rnd1: 3 sc in mr. (3)
Rnd2: (inc), repeat 3 times. (6)
Rnd3: (inc, 1 sc) repeat 3 times. (9)
Rnd4: 1 sc in every st around. (9)
Fasten off and leave tail for sewing. Don't stuff. Sew to the right side of Kitty’s head.


Santa Kitty Tail:
Body color ~ White
Rnd1: 6 sc in mr. (6)
Rnd2: 1 sc in every st around. (6)
Fasten off and leave a long tail for sewing. Stuff lightly. Sew to the top of Kitty’s booty.


Santa Hat:
Hat color ~ Hot Red
Rnd1: 4 sc in mr. (4)
Rnd2: 1 sc in every st around. (4)
Rnd3: (inc, 1 sc) repeat 2 times. (6)
Rnd4-7: 1 sc in every st around. (6)
Rnd3: (inc, 2 sc) repeat 2 times. (8)
Rnd4-5: 1 sc in every st around. (8)
Rnd6: (inc, 1 sc) repeat 4 times. (12)
Rnd7-8: 1 sc in every st around. (12)
Rnd9: (inc, 2 sc) repeat 4 times. (16) Fasten off Red
Rnd10-12: Attach white. 1 sc in every st around. (16)
Fasten off and leave tail for sewing.
Pom-Pom Ball:
White
ch 2, in second ch from hook make a bobble stitch then ch 1.
Fasten off and leave tail for sewing. Sew to the top of the Santa hat.
Stuff hat lightly. Sew to the left side of Kitty’s head.


Santa Kitty Bow
:
Bow color ~ Kelly Green
Row1: Ch 6 (6)
Row2: 1 sc in the 2nd ch from hook, 1 sc in each of the next 3 ch spaces, 3 sc in last st. (7)
Row3: Now working on the other side of ch, 1 sc in next 4 ch spaces, 3 sc in last st. (11)
Row4: 1 sc in the next 6 st, 3 sc in next st,1 sc in the next 6 st, 3 sc in next st. (18) Fasten off and leave a long tail for sewing. Weave tail to the center of bow. Pinch center and loop tail 3-4 times over the center of the bow. Tie end in back and leave for sewing to the Santa hat.
Circle center: Make 4sc in mr. Pull mr closed. Fasten off. Sew onto the center of the bow. Sew bow to front of the Santa hat. Weave in ends.


Final Touches for Santa Kitty:
Use black embroidery floss to add whiskers near Santa Kitty’s eyes. If you would like the Santa hat to stay folded over, use some scrap red yarn and stitch fold in place.


Add an ornament hook to the top of Santa Kitty to hang on your Christmas tree.


**Don’t forget to credit Crochet by Sarah Louise as the pattern designer. Please don’t copy or post this pattern or photos as your own. I would love to see your beautiful work. Please share a photo! Don't forget to tag @crochetbysarahlouise and use hashtags (#crochetbysarahlouise, #cbslpatterns, #crochetwithsarah)